🚀 使用Ollama创建您自己的GitHub Copilot:继续,LLM魔法和API强大!✨
介绍
- 人工智能和LLM无处不在:让我们说实话,现在每个人和他们的狗都在尝试运行LLM。这是自切片面包以来最流行的东西-只不过它是在写代码而不是制作三明治。
- 开发人员 + 人工智能 = 最佳伙伴💻:AI 动力工具就像有一个编码的搭档,可以在您喝咖啡☕时工作。告别寻找丢失分号的日子!
- 什么是副驾驶员?: 将其视为您的个人编码助手🧠。 副驾驶员在您为您编写代码的同时获得所有的荣誉(以及更多的咖啡休息时间)。
- Copilot 的魔法:它正在撼动科技世界🌍,减少编码时间,使我们看起来像天才。说真的,为什么我们没早想到这个?
让我们不浪费时间,直接跳入过程吧!
AI助手如GitHub Copilot是如何工作的?
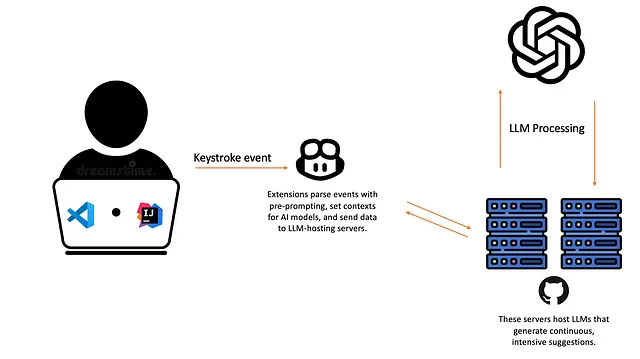
- 安装和验证:首先安装扩展并登录,确保您已完成必要的验证。
- 按键记录:一旦启用扩展程序,您的按键就会开始被记录。
- 输入解析:当您输入时,扩展程序会解析您的输入并为LLM提供上下文信息,向服务器发送API调用。
- 上下文快照:您的代码定期快照发送到扩展程序的服务器,为LLM提供有关您的代码库的上下文。
- LLM处理:LLM处理输入并通过API调用向扩展发送建议。
数据隐私问题
这个过程引发了一个重大问题:您的数据被记录到GitHub的系统中。您的代码库可能包含敏感信息,比如密钥,这些LLM可能会访问。关于这一点的更多信息在这里涵盖。
项目需求
要建立自己的Copilot,您需要以下物品:
Node.js:一个强大的JavaScript运行时,可以让你在服务器端运行JavaScript。
安装指南:如何安装Node.js
Python:一种多才多艺的编程语言,非常适合人工智能和脚本任务。
安装指南:下载并安装Python 3
确保在开始项目之前,你已经安装并准备好了两者!
Ollama:它提供了一个简单的API,用于创建、运行和管理模型,以及一个预构建模型的库,可以轻松在各种应用程序中使用。
步骤
1. 安装Ollama
在设置好Node.js和Python之后,现在是安装Ollama的时候了!选择适合您操作系统的安装方法:
- Mac用户🍏:从官方网站下载并安装Ollama: 下载Mac版Ollama
- Windows用户🪟:从这里下载安装程序:下载Ollama for Windows
- Linux 用户 🐧:使用以下命令直接安装 Ollama:
curl -fsSL https://ollama.com/install.sh | sh
安装ollama后,您需要下载一些LLM模型,这些模型将为扩展提供动力。
我个人更喜欢这些,安装它们的命令如下。
ollama run codellama
ollama run deepseek-coder:6.7b
ollama run starcoder2:3b
2. 安装继续 🔄
续约是一个强大的扩展,可以安装在VSCode和JetBrains IDEs上。它有助于将Ollama无缝连接到您的开发环境。
- 对于VSCode:您可以直接从市场安装Continue:为VSCode安装Continue
- 对于JetBrains:访问JetBrains Marketplace,找到适合您的IDE的扩展。
这个扩展将使您能够直接在编码环境中利用Ollama的功能,使您的工作流程更加顺畅!
3. 在Ollama上设置身份验证
a. Ollama配置:Ollama通常在端口11434上运行,允许任何人访问API。这里有一个示例curl命令,用于访问其模型并生成答案:
curl --location 'http://localhost:11434/api/generate' \
--header 'Content-Type: application/json' \
--header 'Authorization: Bearer <lol>' \
--data '{
    "model": "starcoder2:3b",
    "raw": true,
    "keep_alive": 1800,
    "options": {
        "temperature": 0.01,
        "num_predict": 1024,
        "stop": [
            "<fim_prefix>",
            "<fim_suffix>",
            "<fim_middle>",
            "<file_sep>",
            "<|endoftext|>",
            "</fim_middle>",
            "</code>",
            "\n\n",
            "\r\n\r\n",
            "/src/",
            "#- coding: utf-8",
            "```",
            "t.",
            "\nt",
            "<file_sep>",
            "\nfunction",
            "\nclass",
            "\nmodule",
            "\nexport",
            "\nimport"
        ],
        "num_ctx": 4096
    },
    "prompt": "<fim_prefix>\nnumbers<fim_suffix>\n<fim_middle>"
}'
b. 安装依赖项
以下是您的Express应用程序的package.json,其中实现了身份验证逻辑:
{
  "name": "your-app-name",
  "version": "1.0.0",
  "description": "A simple Express application",
  "main": "index.js",
  "scripts": {
    "start": "node index.js"
  },
  "author": "rahul.tah",
  "license": "ISC",
  "dependencies": {
    "axios": "^0.24.0",
    "body-parser": "^1.19.0",
    "express": "^4.17.1",
    "sqlite3": "^5.0.2"
  }
}
安装必要的依赖项,请运行以下命令:
npm install axios body-parser express sqlite3
c. 认证脚本
这里是实现身份验证的脚本。
const express = require("express");
const axios = require("axios");
const bodyParser = require("body-parser");
const sqlite3 = require("sqlite3").verbose();
const app = express();
const port = 3000;

// Initialize SQLite database
const db = new sqlite3.Database('tokens.db');

// Middleware to log requests
const loggingMiddleware = (req, res, next) => {
    console.log("Request received:", req.method, req.url);
    next();
};

// Authentication Middleware
const authMiddleware = (req, res, next) => {
    const authHeader = req.headers['authorization'];

    if (!authHeader || !authHeader.startsWith('Bearer ')) {
        return res.status(401).json({ error: "Authorization header missing or malformed" });
    }

    const token = authHeader.split(' ')[1]; // Extract the Bearer token

    // Check the token against the SQLite database
    db.get('SELECT token FROM tokens WHERE token = ?', [token], (err, row) => {
        if (err) {
            console.error("Database error:", err);
            return res.status(500).json({ error: "Internal server error" });
        }

        if (!row) {
            return res.status(403).json({ error: "Invalid API token" });
        }

        // Token is valid, proceed to the next middleware or route handler
        next();
    });
};

// Use body-parsing middleware
app.use(bodyParser.json());
app.use(loggingMiddleware);
app.use(authMiddleware);

// Route to handle requests and forward them to the 11434 service
app.use((req, res, next) => {
    const url = `http://localhost:11434${req.url}`;
    console.log(`Request received: ${req.url} ${JSON.stringify(req.body)} ${JSON.stringify(req.headers)}`);

    axios[req.method.toLowerCase()](url, req.body)
        .then((response) => {
            res.status(response.status).send(response.data);
        })
        .catch((error) => {
            console.error("Error forwarding request:", error);
            res.status(500).json({ error: "Internal server error" });
        });
});

app.listen(port, () => {
    console.log(`Server listening on port ${port}`);
});
这段脚本设置了一个Express服务器,用于在将请求转发到Ollama API之前对其进行验证。
4. 生成验证令牌
为了让认证脚本正常运行,您需要将SQLite数据库填充一个认证令牌。以下是一个简单的Python脚本来生成一个API令牌:
a. 生成令牌的Python脚本
import sqlite3
import secrets

def generate_token():
    token = secrets.token_hex(32)
    conn = sqlite3.connect('tokens.db')
    cursor = conn.cursor()

    cursor.execute('''
    CREATE TABLE IF NOT EXISTS tokens (
        id INTEGER PRIMARY KEY AUTOINCREMENT,
        token TEXT NOT NULL UNIQUE,
        description TEXT
    )
    ''')

    description = input("Enter a description for this token (e.g., user or service name): ")
    cursor.execute('INSERT INTO tokens (token, description) VALUES (?, ?)', (token, description))

    conn.commit()
    conn.close()

    print(f"Generated API Token: {token}")

if __name__ == "__main__":
    generate_token()
b. 安装必要的库
在运行脚本之前,请确保已安装了必要的库。您可以使用pip安装它们:
pip install sqlite3
请注意:sqlite3模块已包含在Python标准库中,因此通常不需要单独安装。
c. 运行脚本
- 将脚本保存为generate_token.py。
- 在您的终端中执行脚本:
python generate_token.py
3. 跟随提示输入代币的描述。
一旦您运行这个脚本,它将生成一个独特的API令牌,将其存储在tokens.db SQLite数据库中,并显示令牌供您使用。
5. 配置 Continue.dev
现在是配置Continue.dev扩展的时候了,它将连接到我们的包装服务并发送认证令牌。这个配置将确保一切都可以很顺畅地运行在一起。
基本配置
您可以在官方文档中找到更多配置设置: Continue.dev配置。
这是我为Continue设置的配置:
{
    "models": [
        {
            "title": "codellama",
            "provider": "ollama",
            "model": "codellama",
            "contextLength": 2048,
            "apiBase": "http://localhost:3000/",
            "apiKey": "<Your generated API key>"
        }
    ],
    "customCommands": [
        {
            "name": "test",
            "prompt": "{{{ input }}}\n\nWrite a comprehensive set of unit tests for the selected code. It should setup, run tests that check for correctness including important edge cases, and teardown. Ensure that the tests are complete and sophisticated. Give the tests just as chat output, don't edit any file.",
            "description": "Write unit tests for highlighted code"
        }
    ],
    "tabAutocompleteModel": {
        "title": "Starcoder2 3b",
        "provider": "ollama",
        "model": "deepseek-coder",
        "apiBase": "http://localhost:3000/",
        "apiKey": "<Your generated API key>"
    },
    "contextProviders": [
        {
            "name": "code",
            "params": {}
        },
        {
            "name": "docs",
            "params": {}
        },
        {
            "name": "diff",
            "params": {}
        },
        {
            "name": "terminal",
            "params": {}
        },
        {
            "name": "problems",
            "params": {}
        },
        {
            "name": "folder",
            "params": {}
        },
        {
            "name": "codebase",
            "params": {
                "nRetrieve": 25,
                "nFinal": 5,
                "useReranking": true
            }
        }
    ],
    "slashCommands": [
        {
            "name": "edit",
            "description": "Edit selected code"
        },
        {
            "name": "comment",
            "description": "Write comments for the selected code"
        },
        {
            "name": "share",
            "description": "Export the current chat session to markdown"
        },
        {
            "name": "cmd",
            "description": "Generate a shell command"
        },
        {
            "name": "commit",
            "description": "Generate a git commit message"
        }
    ]
}
一旦您已配置以上设置并选择继续,您就准备好使用了!您已成功设置了自己的 GitHub Copilot!😎

結論
现在你已经拥有了!🎉 你已经成为了一个编码大师,拥有自己的AI副驾驶。🪄✨ 有了Ollama、Continue.dev,再加上一点魔法(和一些令牌),你现在可以比咖啡冲泡得更快编码!☕️🚀
所以,继续前行,释放你的创造力,让那些代码飞起来吧!只是记住:伟大的力量伴随着巨大的责任 - 不要让你的人工智能太放肆了!😄💻
快乐编程!🥳