使用芭蕾舞者创建令人惊叹的视觉效果:您的OpenAI图像API指南
这篇文章是使用Ballerina Swan Lake Update 9.3(2201.9.3)编写的。

介绍
在当今的数字景观中,视觉内容至关重要。从引人入胜的营销活动到引人入胜的产品设计,图像在传达理念和推动创意方面发挥着关键作用。但从零开始创建独特和定制的视觉内容可能会耗时且资源密集。
输入芭蕾舞者OpenAI图片连接器 - 一个旨在简化生成AI动力图像过程的工具,以满足您的需求。无论您是想要从文本提示生成令人惊叹的视觉效果,编辑现有图像,还是为产品设计创建变化,该连接器将OpenAI的DALL·E模型的力量直接带入您的工作流程中。
使用Ballerina直观的云原生语言,开发人员可以轻松集成OpenAI的图像生成API,让您可以快速高效地将想法变成现实。不再需要复杂的集成 - 尽在指尖的无缝创意。
使用案例概述
在本指南中,我们将演示如何在现实世界中使用Ballerina来快速可视化产品设计。通过生成一个产品的基本图像,比如一个智能手机,并创建多种设计变化,您可以快速向客户展示不同的选项。这有助于他们可视化最终产品,并更快地做出明智的决定。Ballerina OpenAI图像连接器简化和自动化这一过程,提高创造力和生产力,同时节省宝贵的时间。
先决条件
为了使用OpenAI连接器,您必须通过OpenAI平台帐户并在其下有一个项目来访问OpenAI API。如果您没有OpenAI平台帐户,您可以在这里注册一个。
1. 打开OpenAI平台仪表板。
2. 导航至控制台 -> API密钥
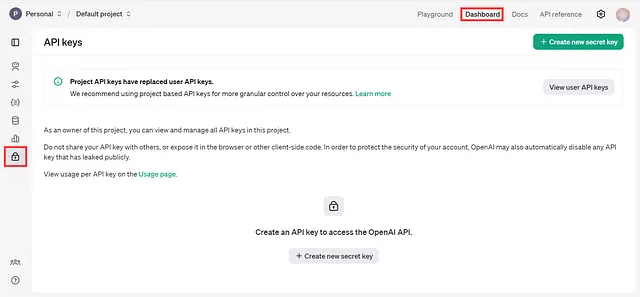
3. 点击“创建新的秘钥”按钮。
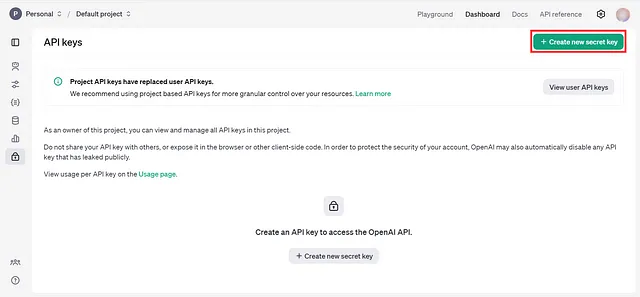
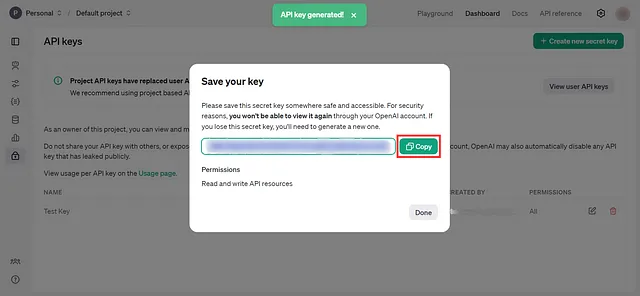
4. 填写详细信息,然后点击创建密钥。

5. 将API密钥安全存储以在您的应用程序中使用。
让我们开始
现在您已经拥有了您的OpenAI API密钥,让我们深入研究使用Ballerina OpenAI Images连接器的实际场景。想象一下,您是一个设计师,正在为智能手机项目工作,并需要为客户展示生成带有各种变化的产品视觉效果。
按照以下步骤设置Ballerina项目并开始生成图片。
步骤01:创建一个芭蕾舞女项目
首先,请确保您已经安装了Ballerina。如果没有,请在这里下载。如果Ballerina已经安装,请使用这个命令更新到最新版本。
bal dist update
现在,创建一个新的芭蕾舞者项目。
bal new product_visualizer
这将创建一个带有必要文件的新项目文件夹。打开 main.bal 文件并导入 OpenAI Images 模块。
import ballerinax/openai.images;
步骤02:初始化OpenAI客户端
接下来,让我们初始化与 API 通信的 OpenAI 客户端。使用 Ballerina OpenAI Images 模块提供的 images:Client 图像。
在您的main.bal文件中,包含以下代码以设置客户端
import ballerinax/openai.images;

configurable string apiKey = ?;

final images:Client openAIImages = check new ({
    auth: {
        token: apiKey
    }
});
管理您的API密钥,请将其安全地存储在项目根目录下的Config.toml文件中。文件应该如下所示:
apiKey = "<your-openai-api-key>"
步骤03:生成产品图片
现在,让我们使用OpenAI图片生成API生成一个智能手机的基本图像。将以下代码添加到您的main.bal文件中。
import ballerina/io;
import ballerina/mime;
import ballerinax/openai.images;

configurable string token = ?;

public function main() returns error? {

    io:println("Generating a product image using the OpenAI API...");

    // Generate a base product image using the `images/generation` API
    string generationPrompt = "a sleek and modern smartphone with a curved screen and minimalist design";

    images:CreateImageRequest generationRequest = {
        prompt: generationPrompt,
        model: "dall-e-3",
        n: 1,
        response_format: "b64_json",
        size: "1024x1024"
    };

    images:ImagesResponse generationResponse = check openaiClient->/images/generations.post(generationRequest);

    io:println("Product image generated successfully.");

    // Save the generated product image in base64 format
    string? b64GenImage = generationResponse.data[0].b64_json;
}
这段代码生成一个智能手机的基本图像。它使用提示“一个流线型和现代化的智能手机,带有弧形屏幕和极简设计”来指导OpenAI API。生成的图像将以base64格式存储。
步骤 04:保存生成的图像
现在我们将解码base64图像并将其保存为PNG文件。在基本图像生成块下方添加以下代码:
if b64GenImage is string {
    io:println("Saving the generated product image...");
    // Decode the base64 string to get image bytes
    string|byte[]|io:ReadableByteChannel|mime:DecodeError genImageBytes = mime:base64Decode(b64GenImage.toBytes());

    if genImageBytes is byte[] {
        // Save the base image to a file
        error? saveGenImageResult = io:fileWriteBytes("images/product_image.png", genImageBytes);

        if saveGenImageResult is error {
            io:println("Error writing the base image to a file: ", saveGenImageResult);
            return;
        } else {
            io:println("Generated product image saved successfully as 'images/product_image.png'.");
        }
    }
}
生成的产品图像被解码并保存为product_image.png在图像目录中。
步骤05:创建产品图片的变体
接下来,让我们使用OpenAI API创建三种生成图像的变体。添加以下代码:
io:println("Creating 3 variations of the generated product image...");

// Create 3 variations of the generated product image using the `images/variations` API
images:CreateImageVariationRequest variationRequest = {
    image: {
        fileContent: genImageBytes,
        fileName: "product_image.png"
    },
    n: 3,
    size: "1024x1024",
    response_format: "b64_json"
};

images:ImagesResponse variationResponse = check openaiClient->/images/variations.post(variationRequest);

io:println("Variations generated successfully.");
这段代码使用图像/变化API来创建产品图像的三种设计变体。
步骤06:保存图像变体
最后,保存生成的图像变化。添加以下代码以将每个变化保存为PNG文件:
foreach var i in 0 ..< variationResponse.data.length() {
    string? b64VariationImage = variationResponse.data[i].b64_json;

    if b64VariationImage is string {
        io:println("Saving variation ", i + 1, "...");
        // Decode the base64 string to get variation image bytes
        string|byte[]|io:ReadableByteChannel|mime:DecodeError variationImageBytes = mime:base64Decode(b64VariationImage.toBytes());

        if variationImageBytes is byte[] {
            // Save the variation image to a file
            string variationFileName = string `images/product_image_variation_${i + 1}.png`;
            error? saveVariationImageResult = io:fileWriteBytes(variationFileName, variationImageBytes);

            if saveVariationImageResult is error {
                io:println("Error writing variation ", i + 1, " to a file: ", saveVariationImageResult);
            } else {
                io:println(string `Variation ${i + 1} saved successfully as '${variationFileName}'.`);
            }
        }
    }
}
这个代码块循环遍历三种变化,并将它们保存为product_image_variation_1.png,product_image_variation_2.png和product_image_variation_3.png。
通过跟随以下步骤,您可以轻松使用提供的Ballerina代码使用OpenAI Images API 生成和创建产品图片的变化。完整的实现如下。
import ballerina/io;
import ballerina/mime;
import ballerinax/openai.images;

configurable string token = ?;

public function main() returns error? {

    // Initialize the OpenAI Images client with your API key
    final images:Client openaiClient = check new ({
        auth: {
            token
        }
    });

    io:println("Generating a product image using the OpenAI API...");
    // Generate a base product image using the `images/generation` API
    string generationPrompt = "a sleek and modern smartphone with a curved screen and minimalist design";

    images:CreateImageRequest generationRequest = {
        prompt: generationPrompt,
        model: "dall-e-3",
        n: 1,
        response_format: "b64_json",
        size: "1024x1024"
    };

    images:ImagesResponse generationResponse = check openaiClient->/images/generations.post(generationRequest);

    io:println("Product image generated successfully.");

    // Save the generated product image in base64 format
    string? b64GenImage = generationResponse.data[0].b64_json;

    if b64GenImage is string {
        io:println("Saving the generated product image...");
        // Decode the base64 string to get image bytes
        string|byte[]|io:ReadableByteChannel|mime:DecodeError genImageBytes = mime:base64Decode(b64GenImage.toBytes());
        if genImageBytes is byte[] {
            // Save the base image to a file
            error? saveGenImageResult = io:fileWriteBytes("images/product_image.png", genImageBytes);

            if saveGenImageResult is error {
                io:println("Error writing the base image to a file: ", saveGenImageResult);
                return;
            } else {
                io:println("Generated product image saved successfully as 'images/product_image.png'.");
            }

            io:println("Creating 3 variations of the generated product image...");

            // Create 3 variations of the generated product image using the `images/variations` API
            images:CreateImageVariationRequest variationRequest = {
                image: {
                    fileContent: genImageBytes,
                    fileName: "product_image.png"
                },
                n: 3,
                size: "1024x1024",
                response_format: "b64_json"
            };

            images:ImagesResponse variationResponse = check openaiClient->/images/variations.post(variationRequest);

            io:println("Variations generated successfully.");

            // Save each variation to a file
            foreach var i in 0 ..< variationResponse.data.length() {
                string? b64VariationImage = variationResponse.data[i].b64_json;

                if b64VariationImage is string {
                    io:println("Saving variation ", i + 1, "...");
                    // Decode the base64 string to get variation image bytes
                    string|byte[]|io:ReadableByteChannel|mime:DecodeError variationImageBytes = mime:base64Decode(b64VariationImage.toBytes());
                    if variationImageBytes is byte[] {
                        // Save the variation image to a file
                        string variationFileName = string `images/product_image_variation_${i + 1}.png`;
                        error? saveVariationImageResult = io:fileWriteBytes(variationFileName, variationImageBytes);

                        if saveVariationImageResult is error {
                            io:println("Error writing variation ", i + 1, " to a file: ", saveVariationImageResult);
                        } else {
                            io:println(string `Variation ${i + 1} saved successfully as '${variationFileName}'.`);
                        }
                    }
                }
            }
        }
    }
}
使用 bal run 命令执行代码。
您已成功完成利用Ballerina OpenAI Images Connector生成和定制产品图像的旅程。我们希望这个指南为您提供了有价值的见解,帮助您更好地利用Ballerina与OpenAI的图像生成API。
参与
- 访问OpenAI Images软件包以获取更多详细信息。
- 查看我们在Ballerina示例中的示例。
- 通过我们的Discord服务器与我们进行实时聊天。
- 在Stack Overflow上使用#ballerina标签发布所有技术问题。