使用AWS Amplify和Amazon Bedrock构建类似ChatGPT的WebApp
简而言之:本文将指导您使用Vue.js和Pinia构建类似ChatGPT的Web应用程序,并集成AWS服务。我们将使用Amazon Cognito进行身份验证和Amazon Bedrock进行人工智能功能。
这种无服务器方法使得易于扩展和维护,侧重于前端开发,同时利用AWS强大的全面托管服务。
介绍
在先前的文章中,我们使用AWS服务建立了一个无服务器后端基础设施,包括用于身份验证的Amazon Cognito和用于访问大型语言模型的Amazon Bedrock。 现在,是时候通过现代的Web界面让我们的聊天机器人栩栩如生了。
在本文中,我们将通过使用Vue.js和Pinia进行状态管理来构建类ChatGPT的网络应用程序的过程。我们将把我们的应用程序与之前设置的Cognito身份验证集成,并使用亚马逊Bedrock来支持我们的人工智能对话。
让我们一起深入研究,并创建一个引人入胜、响应灵敏的聊天界面,充分利用大型语言模型(LLMs)的力量!
设置 🔨
让我们从使用Pinia为状态管理创建一个新的Vue.js项目开始:
npm init vue@latest
# Choose the following options:
# - Project name: backendless-bedrock-gptui
# - Add TypeScript? No
# - Add JSX Support? No
# - Add Vue Router for Single Page Application development? Yes
# - Add Pinia for state management? Yes
# - Add Vitest for Unit Testing? No
# - Add an End-to-End Testing Solution? No
# - Add ESLint for code quality? No
# - Add Vue DevTools 7 extension for debugging? (experimental) No

cd backendless-bedrock-gptui
npm i
npm i aws-amplify @aws-amplify/ui-vue
npm i @aws-sdk/client-bedrock @aws-sdk/client-bedrock-runtime
为什么选择Vue?因为我不是一个前端开发者,我个人觉得Vue是开发Web应用程序最简单的JS框架。
配置放大器和基岩客户端 🧑💻
不再使用Amplify CLI,我们将直接在应用程序中使用先前设置的参数来配置Amplify。
创建一个新文件 src/configs/amplify-config.js:
const amplifyConfig = {
    Auth: {
        Cognito: {
            userPoolId: 'YOUR_USER_POOL_ID',
            userPoolClientId: 'YOUR_APP_CLIENT_ID',
            identityPoolId: 'YOUR_IDENTITY_POOL_ID',
            allowGuestAccess: false,
            signUpVerificationMethod: 'code',
            loginWith: {
                oauth: {
                    domain: 'YOUR_COGNITO_DOMAIN',
                    scopes: [
                        'email',
                        'openid',
                    ],
                    redirectSignIn: ['YOUR_CLOUDFRONT_DISTRIBUTION_URL'],
                    redirectSignOut: ['YOUR_CLOUDFRONT_DISTRIBUTION_URL'],
                    responseType: 'code'
                }
            }
        }
    }
};

export default amplifyConfig;
请用您的CloudFormation堆栈输出值替换 YOUR_COGNITO_DOMAIN、YOUR_USER_POOL_ID、YOUR_APP_CLIENT_ID、YOUR_IDENTITY_POOL_ID 和 YOUR_CLOUDFRONT_DISTRIBUTION_URL。
现在,让我们更新我们的src/main.js文件来配置Amplify:
import { createApp } from 'vue'
import { createPinia } from 'pinia'
import App from './App.vue'
import router from './router'
import { Amplify } from 'aws-amplify'
import amplifyConfig from './configs/amplify-config'
import '@aws-amplify/ui-vue/styles.css'

Amplify.configure(amplifyConfig)

const app = createApp(App)

app.use(createPinia())
app.use(router)

app.mount('#app')
搭建Pinia商店 💽
让我们创建两个 Pinia 存储来管理已登录用户和我们的聊天状态。
创建一个新文件 src/stores/user.js:
import { onMounted, ref } from 'vue'
import { defineStore } from 'pinia'

import { BedrockClient } from '@aws-sdk/client-bedrock'
import { BedrockRuntimeClient } from '@aws-sdk/client-bedrock-runtime'

import { signInWithRedirect, getCurrentUser, signOut, fetchAuthSession } from 'aws-amplify/auth'
import { Hub } from 'aws-amplify/utils'

const defaultRegion = 'us-west-2'

export const useUserStore = defineStore('user', () => {
    const user = ref()

    onMounted(async () => {
        console.log('Store onMounted')
        try {
            user.value = await getCurrentUser()
        } catch (e) {
            signInWithRedirect().catch(() => null)
            return
        }
    })

    Hub.listen('auth', async ({ payload }) => {
        switch (payload.event) {
            case 'signInWithRedirect':
                user.value = await getCurrentUser()
                break
            case 'signInWithRedirect_failure':
                // handle sign in failure
                break
            case 'customOAuthState':
                break
        }
    })

    async function getBedrockClient(region = defaultRegion) {
        const session = await fetchAuthSession()
        const client = new BedrockClient({
            region,
            credentials: session.credentials,
        })
        return client
    }

    async function getBedrockRuntimeClient(region = defaultRegion) {
        const session = await fetchAuthSession()
        const client = new BedrockRuntimeClient({
            region,
            credentials: session.credentials,
        })
        return client
    }

    const signOutUser = async () => {
        await signOut()
        localStorage.clear()
        user.value = undefined
    }

    return { user, signOutUser, fetchAuthSession, getBedrockClient, getBedrockRuntimeClient }
})
我们正在使用这个store来强制用户在应用程序挂载后登录。如果用户尚未登录,则应用程序会重定向到我们在前一篇文章中创建的Cognito托管的UI,并尝试登录用户。我们还在这里设置了用于注入使用Cognito创建的临时凭证的bedrock和bedrock-runtime的SDK客户端的创建。
创建一个新文件 src/stores/chat.js:
import { ref } from "vue";
import { defineStore } from 'pinia'
import { ConverseCommand, ConverseStreamCommand } from "@aws-sdk/client-bedrock-runtime";
import { useLocalStorage } from '@vueuse/core'

import { useUserStore } from "./user";

export const useChatStore = defineStore('chat', () => {
    const userStore = useUserStore()

    const messages = useLocalStorage('messages', ref([]))
    const selectedModel = ref({})
    const selectedModelId = ref("")
    const isLoading = ref(false)

    async function sendMessage(content) {
        const userMessage = { role: 'user', content: [{ text: content }] }

        const bedrockRuntimeClient = await userStore.getBedrockRuntimeClient()

        this.messages.push(userMessage)

        try {
            this.isLoading = true

            const input = {
                modelId: this.selectedModel.modelId,
                messages: this.messages
            }
            let assistantResponse = ""

            if (this.selectedModel.responseStreamingSupported) {
                const response = await bedrockRuntimeClient.send(new ConverseStreamCommand(input));
                this.messages.push({ role: 'assistant', content: [{ text: assistantResponse }] })
                for await (const item of response.stream) {
                    if (item.contentBlockDelta) {
                        assistantResponse += item.contentBlockDelta.delta?.text;
                        this.messages[this.messages.length - 1] = { role: 'assistant', content: [{ text: assistantResponse }] }
                    }
                }

            } else {
                const response = await bedrockRuntimeClient.send(new ConverseCommand(input));
                assistantResponse = response.output.message.content[0].text;
                this.messages.push({ role: 'assistant', content: [{ text: assistantResponse }] })
            }

        } catch (error) {
            console.error(error);

        } finally {
            this.isLoading = false
        }

    }
    function setModel(model) {
        this.selectedModelId = model.modelId
        this.selectedModel = model
    }

    function clearChat() {
        localStorage.removeItem('messages')
        this.messages = useLocalStorage('messages', ref([]))
    }

    return { messages, selectedModel, selectedModelId, isLoading, sendMessage, setModel, clearChat }
})
这家商店提供了与亚马逊Bedrock暴露的LLM进行聊天的方法。我想强调三个不同的方面:
- 聊天存储库依赖于用户存储库,以获取bedrock-runtime客户端。
- 我们正在利用亚马逊Bedrock提供的Converse API,这使我们能够在选择LLM的情况下使用相同的消息格式,而无需调整负载。
- 为了提供更好的用户体验,我们正在利用模型支持的流式响应。感谢这一特性,我们可以在用户等待响应生成时提供更好的首字节加载时间性能(TTFB)。
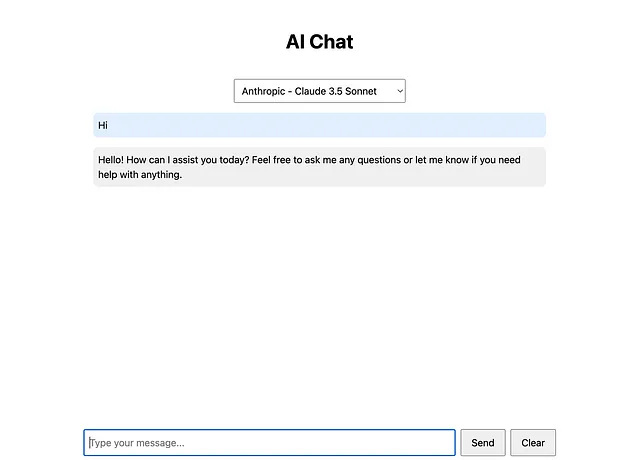
构建用户界面 🖥️
现在,让我们创建我们的聊天界面,更新 src/App.vue:
<template>
  <div class="chat-container">
    <header>
      <h1>AI Chat</h1>
      <select v-model="selectedModelId" @change="setModel">
        <option v-for="model in models" :key="model.modelId" :value="model.modelId">
          {{ model.providerName }} - {{ model.modelName }}
        </option>
      </select>
    </header>
    <main>
      <div class="message-list">
        <div v-for="(message, index) in messages" :key="index" :class="['message', message.role]">
          {{ message.content[0].text }}
        </div>
      </div>
    </main>
    <footer>
      <form @submit.prevent="sendMessage">
        <input v-model="userInput" type="text" placeholder="Type your message...">
        <button type="submit" :disabled="isLoading || !selectedModelId">Send</button>
        <button type="button" :disabled="isLoading || messages.length <= 0" @click="clearChat">Clear</button>
      </form>
    </footer>
  </div>
</template>

<script setup>
import { ref, computed, onMounted } from 'vue'
import { useUserStore } from "./stores/user";
const userStore = useUserStore()

import { useChatStore } from './stores/chat'
const chatStore = useChatStore()

import { ListFoundationModelsCommand } from '@aws-sdk/client-bedrock'

const models = ref([])

const userInput = ref('')
const messages = computed(() => chatStore.messages)
const isLoading = computed(() => chatStore.isLoading)
const selectedModelId = computed(() => chatStore.selectedModelId)

const sendMessage = async () => {
  if (!userInput.value.trim()) return
  await chatStore.sendMessage(userInput.value)
  userInput.value = ''
}

const clearChat = async (event) => {
  chatStore.clearChat()
}

const setModel = async (event) => {
  chatStore.setModel(models.value.find(e => e.modelId === event.target.value))
}

onMounted(async () => {
  console.log('App.vue onMounted')
  try {
    models.value = (await (await userStore.getBedrockClient()).send(new ListFoundationModelsCommand({ byInferenceType: "ON_DEMAND", byOutputModality: "TEXT" }))).modelSummaries
  } catch (e) {
    console.error(e)
    return
  }
})
</script>

<style scoped>
.chat-container {
  display: grid;
  grid-template-rows: auto 1fr auto;
  height: 100vh;
  max-width: 800px;
  margin: 0 auto;
  padding: 1rem;
}

header {
  text-align: center;
}

.message-list {
  overflow-y: auto;
  padding: 1rem;
}

footer form {
  display: flex;
  gap: 0.5rem;
}

input {
  flex-grow: 1;
  padding: 0.5rem;
}

button {
  padding: 0.5rem 1rem;
}

.message {
  margin-bottom: 1rem;
  padding: 0.5rem;
  border-radius: 0.5rem;
}

.user {
  background-color: #e0f0ff;
  align-self: flex-end;
}

.assistant {
  background-color: #f0f0f0;
  align-self: flex-start;
}

.error {
  background-color: #ffe0e0;
  color: #ff0000;
}

select {
  margin-top: 1rem;
  padding: 0.5rem;
}
</style>
这里是一个非常简单的用户界面,使用Amazon Q Developer的帮助创建(尤其是CSS部分)。
一旦挂载了应用组件,它会加载所有可用的基础模型(FMs),这些模型可从亚马逊Bedrock获取,并允许用户从这些生成文本的模型中选择,并适用按需定价模式。
部署应用程序 🚀
现在我们已经准备好我们的应用程序,让我们将其部署到我们在以前的文章中创建的S3存储桶和CloudFront分发中。
首先,构建应用程序的生产版本:
npm run build
这将创建一个包含构建资产的dist文件夹。现在,我们需要将这些文件上传到我们的S3存储桶。您可以使用AWS CLI来实现这一点:
aws s3 sync dist/ s3://your-s3-bucket-name --delete
用您实际S3存储桶的名称替换your-s3-bucket-name。
上传后,您可能还需要使CloudFront缓存无效,以确保立即提供新版本:
aws cloudfront create-invalidation --distribution-id your-cloudfront-distribution-id --paths "/*"
用你实际的CloudFront分发ID替换your-cloudfront-distribution-id。
結論
恭喜!您成功地使用Vue.js、Pinia和Amazon Bedrock构建了一个类似ChatGPT的web应用程序。
有很多方法可以扩展和改进这个应用程序。一些下一步的想法包括:
- 添加对话历史记录,允许多个聊天并在多个设备之间同步。
- Implementing advanced prompt engineering techniques and providing a prompting library. 实施先进的提示工程技术并提供提示库。
- 通过增加诸如 markdown 渲染或代码高亮等功能来优化用户界面。
- 添加支持上传和分析文档。
也许,我会在未来的一篇或多篇文章中探索这些增强功能。关注我 😉。
在这里,您可以找到此文章和之前文章的完整代码存储库:https://github.com/GuidoNebiolo/AWS-Private-ChatGPT